

How To Draw On Your Phone
Scanning PDFs is one of the most annoying things many of u.s.a. have to deal with in our personal and professional lives. Be it mortgage documents, a car loan, or other sensitive paperwork you need to preserve and share in a secure digital format, Adobe's ubiquitous PDF is a reality of dealing in docs in the modern world. Fortunately, you lot don't demand a hardware scanner or large, bulky multifunction printer to digitize your newspaper documents: all y'all need is a smartphone, an app, and a couple of minutes. In this post, nosotros'll break down what you need to practice to get your docs and photos converted to PDF using an Android phone.
There are plenty of means you can generate PDFs in a pinch, and probably a hundred apps that merits to practise it, just we'll exist focusing on 3 proficient ways from three specific and well-known apps to generate PDFs from existent-globe documents: Google Drive, Adobe Scan, and Microsoft Office Lens.
Since each has its own advantages, you can decide for yourself. In full general, I'd recommend Drive if yous only need to scan a document once or twice, since information technology'southward probably already installed on your phone and volition salve you time. Yet, our readers' favorite is Office Lens, and if you're dealing with scanning documents frequently, it'south definitely your all-time choice.
Microsoft Office Lens
Of the four options here, Microsoft Office Lens is probably the best. Whether you lot're deeply integrated into Microsoft's Office suite and services or non, it's pretty fast and easy with a dead-unproblematic interface and all the tools you probably need.
If you're scanning documents regularly from your phone, this is the app you should be using. Its perks include:
- Integration into other Microsoft/Office services like OneNote, OneDrive, Word, and PowerPoint.
- OCR via Give-and-take if you utilise Microsoft Office.
- Dead simple, super-fast interface — you probably don't demand my manus-holding to use information technology (but it'due south here if yous practise).
- Works with images/photos you already have.
Of all the apps on this list, it's the easiest to use:
Left: Firing up the app for the offset time. Eye: Viewfinder. Right: Selecting images from the camera roll.
Just download the app, fire it up, grant it the required permissions, and y'all're off. Apart from an interstitial screen that you'll see the very outset fourth dimension you launch information technology (in a higher place left), you lot'll always be dumped straight to the viewfinder (to a higher place center), equally with Adobe's app.
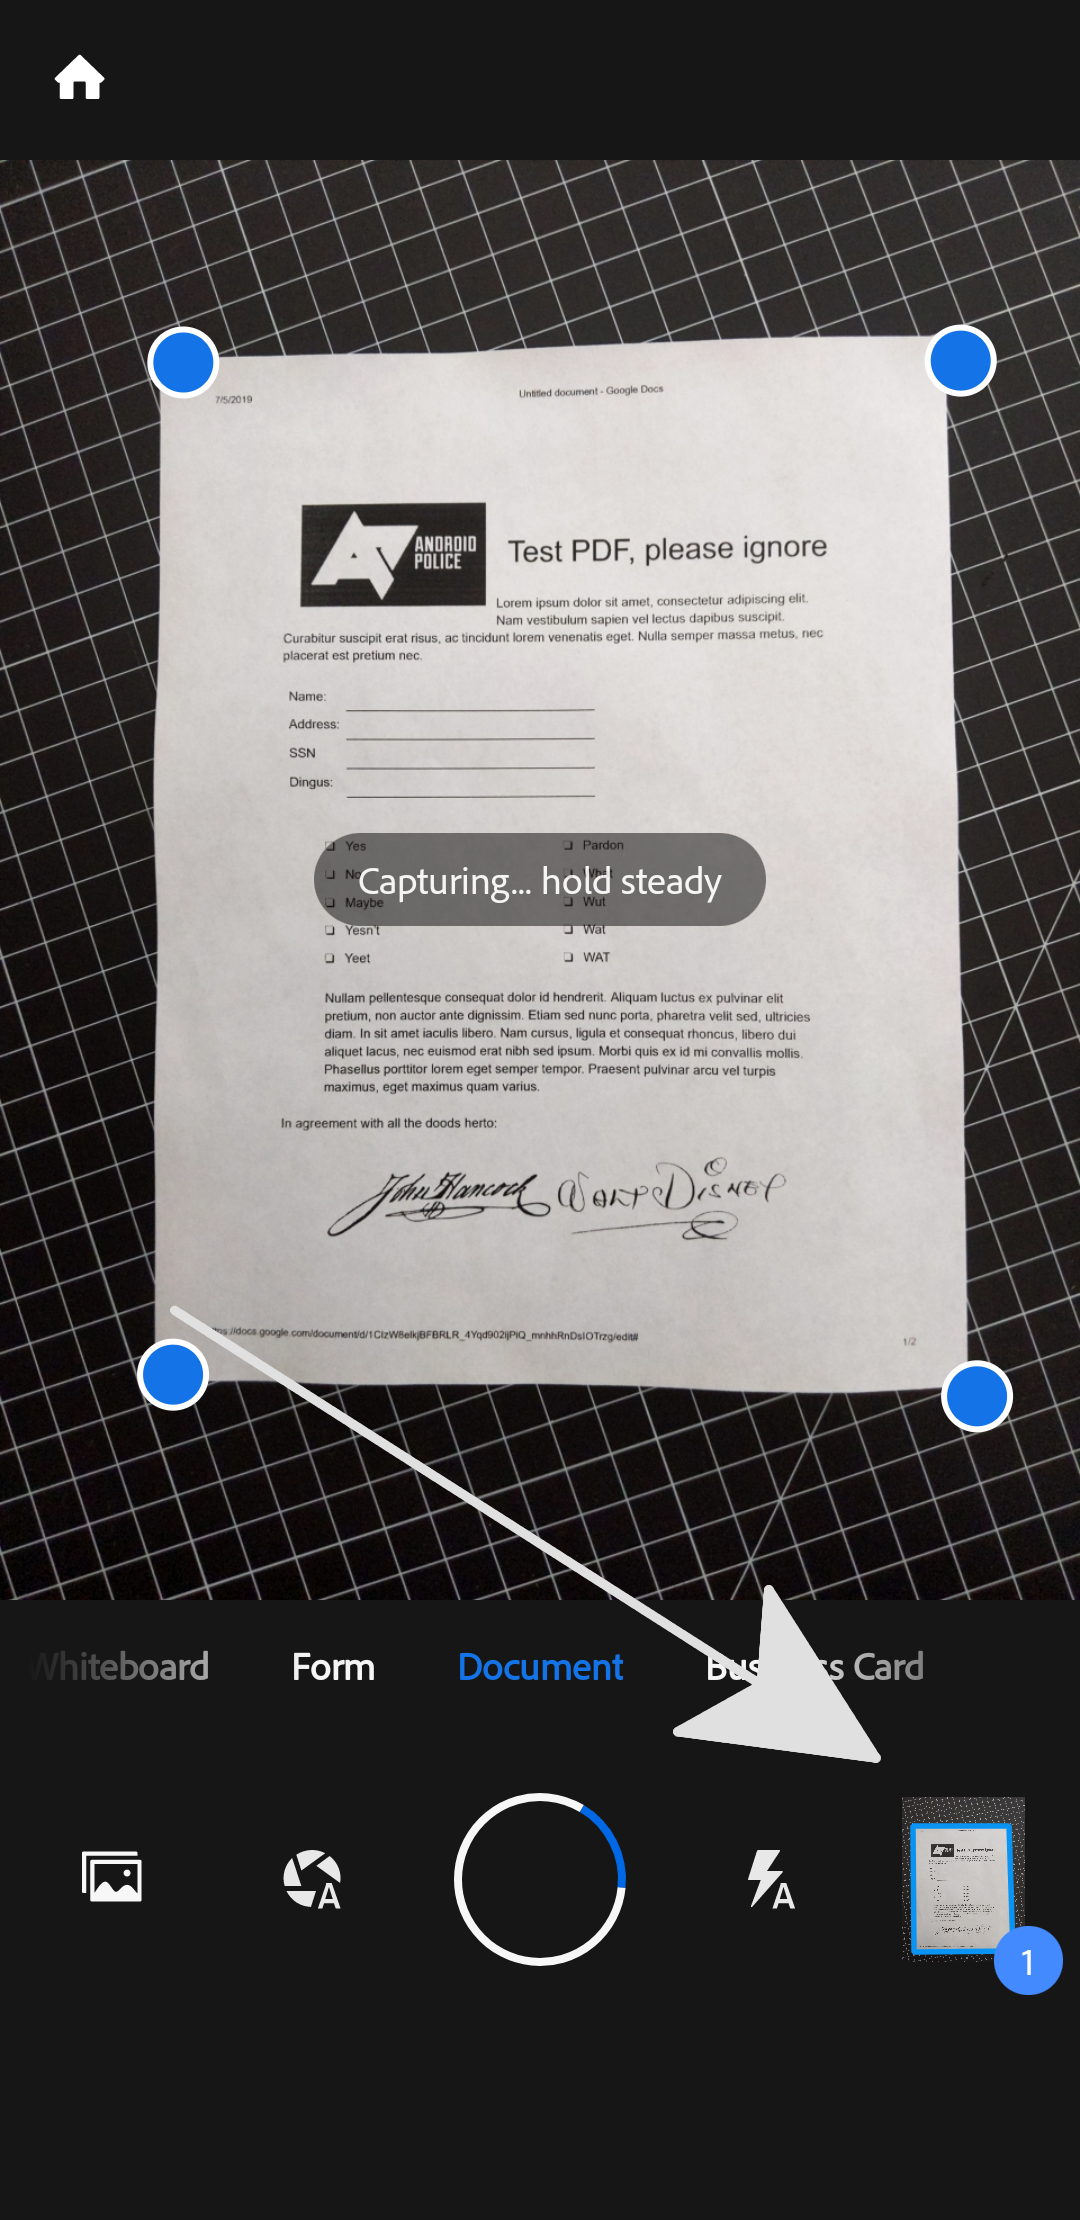
The viewfinder has all the tools you need immediately attainable with just a few taps. Along the bottom of the viewfinder, below the shutter, are dissimilar modes you can switch betwixt based on what you're scanning. You'll probably only utilize the default "document" mode, but y'all can quickly switch to scanning business concern cards, photos, and whiteboards too, each of which triggers its ain preset modes. Above the shutter is your camera roll, offering piece of cake access to images y'all've already captured with your camera app — just tap the images you'd similar to add together to a certificate and so tap the orange arrow that appears to the right of the shutter push (in a higher place correct). You tin also tap the photo/gallery icon to get to a file picker if you need to manually navigate to images exterior the camera coil.
When y'all've got the document lined upwards in the viewfinder, an orange-scarlet rectangle indicates that information technology has a solid lock on its perspective and dimensions (which it can automatically ingather and correct for). Just note that if y'all take photos on a filigree-like background like you meet pictured to a higher place, information technology might issues out a scrap with that automatic cropping. There is a transmission crop tool if that happens, though, and but very specific circumstances like that triggered any misbehavior for me.
Tweaking images before you turn them into a document is very easy.
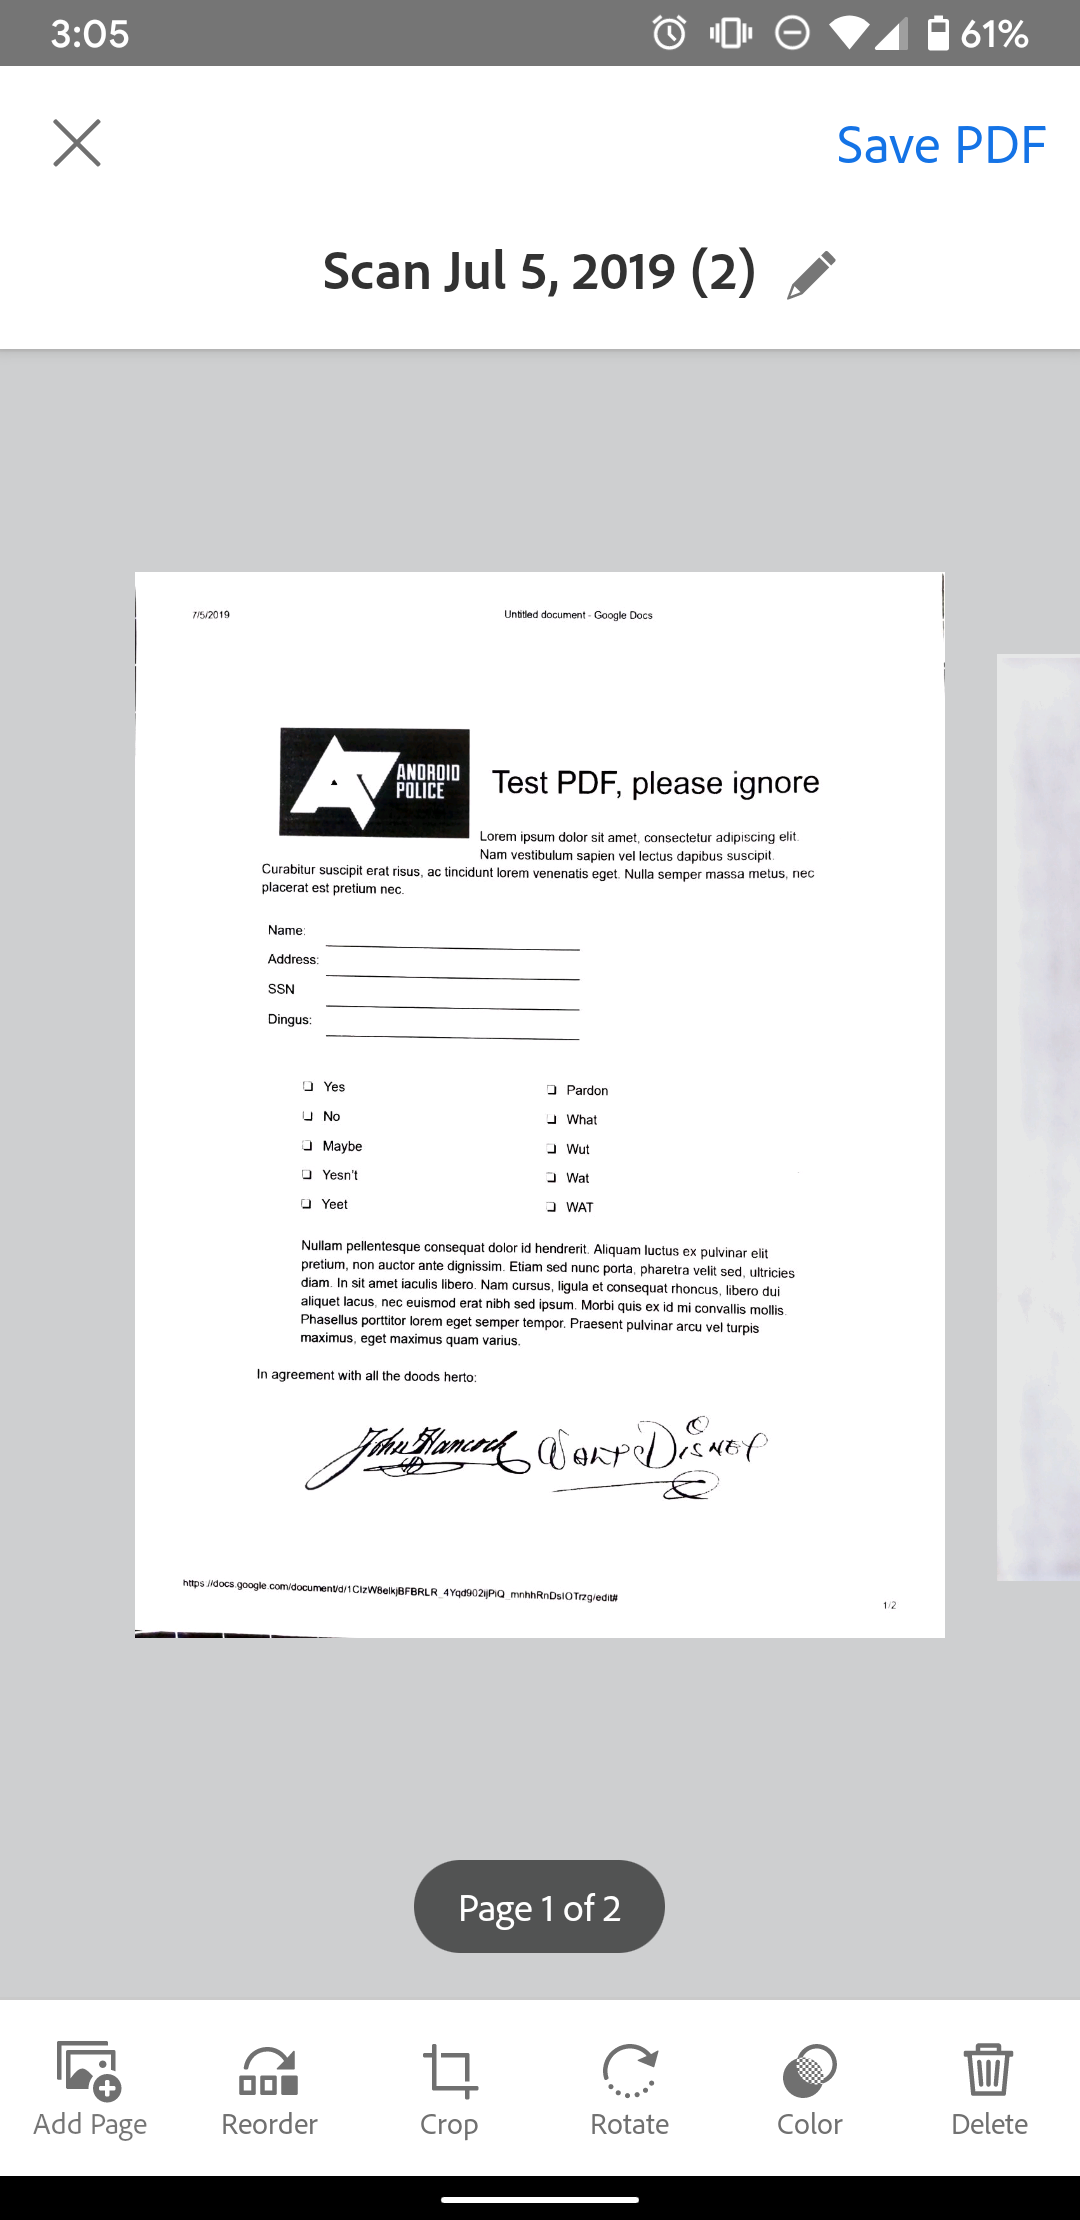
When you've captured a page for your document, the workflow to tweak it is simple. If yous need to add another page to your document, tap the "Add New" button, and y'all are taken back to the viewfinder to add another image — echo that process as necessary with each page of the certificate.
When multiple images are loaded in, you tin can swipe betwixt pages by scrolling left and right. There are filters if you adopt to convert your documents to black and white, etc., easily accessible with a quick swipe up.
Along the top of the screen, you accept about of the other, less frequently used options. You tin can delete images in the electric current document, change their crop, rotate images, change their document type (which adjusts pre-set filters), make a text overlay, or depict on the document. With compression-to-zoom working, you can even add a signature or annotate, if you lot need to.
Unproblematic export process.
When you're done, tap "Done," and you become options for how to save your document. If y'all save it to your Android phone's gallery, that saves it as a JPEG prototype, but there are options to relieve a PDF file to your phone's storage every bit well. Y'all can as well send the image to OneDrive, PowerPoint, or OneNote, and documents can be imported to Microsoft Discussion for OCR if yous prefer to convert it into text.
When the certificate has been saved in a specific format, you're dumped to a listing of files you lot've created in the app, from there you can share or delete them via the three-dot menu on each. If I had to come up upward with one complaint about this app, it'south that a share option could exist integrated into the export screen before this one, but that'due south a very minor business concern.
Nosotros have 2 other, unlike ways of to create a PDF on your Android-powered phone listed beneath. Drive is likely the well-nigh convenient choice for users in a compression, and Adobe Browse is a good tool if you live in the Acrobat ecosystem, just if you scan documents regularly, we still think you owe it to yourself to effort Microsoft Function Lens, it'southward hands the best certificate scanning solution we've used.
Google Drive
The reasons to use Google Drive for your PDF needs are:
- It's elementary and piece of cake.
- You probably don't need to install anything, most phones come up with it.
- It syncs PDFs that it creates to Google Drive, a boon to G Suite-based productivity and cloud storage.
- If you don't demand a local PDF — it can only save to Google Drive.
Creating PDFs in Google Drive on Android is simple:
Left: The floating activity push opens a carte du jour (right) which includes the "Scan" choice for creating PDFs.
Just open the app, tap the "+" floating action button in the corner, and in the resulting carte du jour, select "scan."
Line up, review, and tweak the photos you have for PDFs in Drive.
Line up the document in the viewfinder, trying to make sure all 4 corners are visible and that your view is generally flat, and take the photo. (Belongings the certificate with your hands while scanning is possible, merely you'll need to be careful.) Subsequently a bit of processing, Drive then gives you the selection to review and accept or reject the photograph before importing it into the PDF. Tap the big checkmark when you think the photo is good enough, and the app will right for some distortion and import the document in black and white (by default) to the PDF.
Bulldoze tin can automatically right for perspective, too, and then y'all don't demand to worry too much if you tin can't snag the perfect shot, it will stretch and tweak things to compensate all on its own, though some content might end up a scrap off-kilter.
More options are nested in other menus.
From this screen you can add more than pages to the current certificate ("+" icon), re-capture whatsoever folio that has already been added (the reload/redo icon), change the crop/distortion correction (crop icon in the top correct corner), change color settings (palette icon in the summit right corner), and delete, rotate, or rename the scan (all through the overflow three-dot menu top right). Further options in the nested settings menu allow you to alter newspaper size, orientation, and paradigm quality, though the defaults should be fine for most of united states of america.
Once yous're happy with the results, simply tap the checkmark in the bottom correct. Drive volition ask yous where to salve it in Google Drive and what to proper noun it. After you tap "Save" in the bottom correct corner, it should be in that location. Congrats, you've simply fabricated a PDF with your phone.
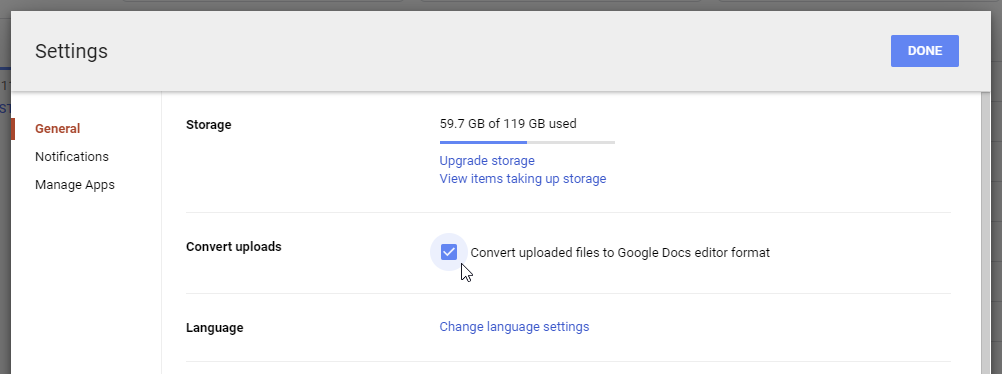
Google Drive can do OCR, simply it's a dissever function.
You can likewise get PDFs captured in this way to generate into text documents via OCR, but it'southward a multi-footstep process. Y'all'll demand to either open the PDF once more afterward in Google Docs as a document or toggle a setting in Google Bulldoze to change how uploaded documents are handled ("Catechumen uploaded files to Google Docs editor format" in Settings -> Full general from the desktop site). Google's OCR is pretty good with text, just foreign formatting or unusual languages, symbols, or graphics can sometimes confuse it, then plan to review information technology later for errors.
Adobe Scan
If yous demand a dissimilar set of features than what Google Drive'southward app can provide, and you're willing to surrender the deeper integration with K Suite's services, Adobe Scan may be more your style. Its advantages include:
- OCR (optical grapheme recognition), which turns scanned documents into searchable, copyable text.
- Works with images/photos yous already have.
- Car-capture streamlines the photo-taking process.
- Works with the Adobe Acrobat app for born signing and filling out forms.
The process for Adobe Scan isn't much more than complicated than it is on Bulldoze, but I would say it is a piddling less user-friendly.
Adobe Scan tin can capture photos automatically and do perspective correction, too.
When you lot open the app (and grant it the permissions it requires to role), you'll exist presented directly to a camera viewfinder. Scrolling left or right through the carousel at the bottom allows you to select between types of documents. The Aperture icon next to the shutter button controls Auto-Capture, which allows Adobe Browse to accept photos of documents automatically in one case they're in frame, and I'd encourage you to accept it on since information technology can save some time. Either way, y'all tin can notwithstanding capture documents manually with the shutter push.
Adobe Scan isn't quite as adept at picking up the edges of documents for perspective correction in my experience, but it offers the chance to correct the crop for each item every bit it is scanned (by default, afterward plenty scans it will ask if you'd like to disable that).
The UI isn't quite every bit articulate as Drive when it comes to advancing steps. The gallery icon is how you move frontward once you lot've taken all your photos.
Once you have captured all of the documents you desire to be included in a given PDF, tap the gallery icon to the lesser right and it takes y'all to a screen where you can review the contents.
Adobe Browse tin brand PDFs from images you've already taken or downloaded.
(If you'd prefer to make a PDF from images that were previously taken, the icon to the bottom left on the capture screen which looks like a stack of photos allows yous to import them into the app to generate a certificate from.)
Options for tweaking PDFs are better labeled in Adobe Scan.
From the review screen, yous can rename the PDF (text/pencil icon top center), or utilize the navigation bar at the bottom to practice things similar add more than pages, reorder items, modify the crop, rotate images, select colour settings, or delete pages.
When yous accept the PDF and its contents in a place that you like it, tapping "Save PDF" in the top left corner saves it locally, dumping you to the default "recent" list of documents in Adobe Browse.
Several ways to open and share PDFs.
From hither yous can share existing documents, open them in Acrobat, and fill them out/sign them via the Adobe Acrobat app. After a brusque bit of processing, the files listed hither also include OCR text. If yous need to get them off of your device (which is probably the whole point of generating a PDF), you can share the files via that aptly-named "share" button. Options include shooting off a link to the file stored on Adobe's Certificate Cloud, sending the file via Electronic mail, or you tin can pass the file to another app via an intent with "Share a copy."
Ane word of warning: I have see issues with non-link, standalone PDF files generated by Adobe Scan. It's clear that Adobe tries to push users into sharing PDFs via links over services it can charge for rather than the files directly (there'due south no option to just save/export the PDF as a file to a specific location, for case). Even so, some of the files it has generated for me take had issues and couldn't be opened, though the online links created at the same time worked fine. YMMV, in my feel, Bulldoze does a ameliorate chore handling PDFs as actual files.
Stack
From the Google Area 120 team, Stack is a worthy mention on our list since it'southward then piece of cake to use and has diverse unique features to enhance your user experience. With the Google proper noun attached to it, you pretty much already expect it to accept something interesting to offer. Some notable features of Stack include:
- Increased security past locking the app with your biometrics, such every bit a fingerprint or facial scan.
- A built-in online backup characteristic to proceed your documents safe at all times.
- Instantly save a copy of your newly scanned documents from the app to Google Drive equally a secondary online backup.
- A one-tap batch export option to quickly relieve all your previously scanned documents to Google Drive.
- Automatically import photos of documents from your photographic camera folder directly into the app.
- Go on your documents peachy and organized by categories, including custom ones if needed.
The Area 120 team is Google'southward in-house coiffure that works on experimental projects and ideas. Stack may non be effectually forever as a standalone app, but it's an first-class selection for our list at this time. The features from Stack could possibly merge with some other mainline Google app or service in the future, such every bit Google Drive.
In one case you download the app and open information technology, select the Google business relationship you lot wish to use and press the "Go along" button. Grant the media permission, then accept or deny the "automatically add new documents" option. Swipe through the few intro pages, so striking "Done." Striking the plus icon at the bottom, and go to "Camera" to scan a document. Grant the camera permission, align the certificate in the viewfinder as needed, and then press the "Scan" button to take the photo.
You lot tin as well utilize the "PDF" pick to import an already existing PDF document for safekeeping purposes. Likewise, the "Gallery" option turns your previously taken photo documents into PDFs.
Afterwards capturing an image of the document, you tin can adjust the color or crop ratio as needed. Stack is usually pretty good at border detection for paper documents, and then you may not accept to modify the ratio size much or fifty-fifty at all. When it comes to adjusting the color, you lot might consider brightening upward a darker document to go far more pleasing to the eye.
Once the colour and ingather ratio are both to your liking, press "Salve" to move on to the next part. You lot can name the document to any you want, then add it to a category (Stacks) of your choosing to keep things organized. Tap i of the icons to identify it into a specific "Stack" or printing "View all," so "Create" to make your ain. In one case you're all prepare here, striking the "Washed" button to finalize your changes.
Yous can accept or deny the "relieve PDF copy" setting for Google Drive if you desire, and then striking "Continue." Y'all should likewise see something about your biometrics on the main screen, so tap "Turn on lock" to secure your scanned documents right abroad.
If you tap your profile icon in the upper right then go to "Settings," you'll notice the residue of the options you can enable or disable at whatsoever time. You can export all your scanned documents to Google Drive with one tap or even delete all of them from your account instantly if needed. Stack overall has plenty of features and is pretty straightforward in terms of usability. It's a highly recommended app and a well-deserved spot on our list.
As long as you lot're connected to a Wi-Fi network, the new documents y'all scan should automatically back up to your Google business relationship. You tin can as well enable the "Support using mobile information" option to save your Stack documents in the cloud while on the go.
Whatever y'all choose, y'all've got options — more nosotros even listed here. Then the next time you think y'all'll accept to find a scanner to put together a PDF, remember that the phone in your pocket is perfectly capable of handling it.
Virtually The Writer
![]()

Source: https://www.androidpolice.com/how-to-create-convert-pdf-phone-camera-android-free/
Posted by: frittsfeellen.blogspot.com
0 Response to "How To Draw On Your Phone"
Post a Comment